 Trap Modification and Adjustment
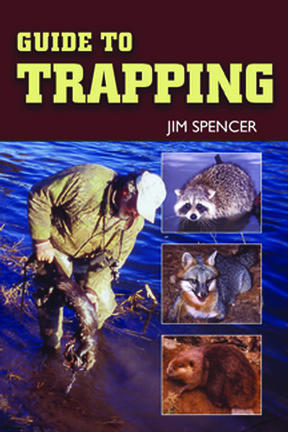
(An excerpt from T&PC Executive Editor Jim Spencer’s “Guide to Trapping”)
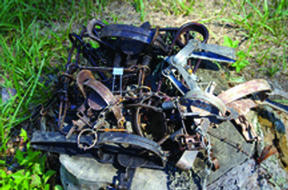
Some trap manufacturers have made the advertising claim that their traps were ready for the trapline “right out of the box.”
Don’t believe it. Every brand, size or style of factory trap can be improved by a little knowledgeable tinkering. Even if there was a perfect trap, it still wouldn’t be ready right out of the box, because it would still have factory grease on it, and it wouldn’t be protected from rusting.
Granted, this is the way many trappers operate — using traps right out of the box. Even some veterans of many years on the line don’t bother to modify, adjust or even clean the oil and metal shavings off their traps. When the season closes, they put their traps up still caked with mud and dirt, and that’s the way they start setting them when the next season comes.
Some of these trappers catch a lot of fur. But when I see a trapper treating his equipment so carelessly, I always wonder: How much more would this guy catch if he’d fine-tune and treat his traps, and how much money would he save on equipment if he took a few steps to protect his traps from rust before using them?
The probable answer: “Quite a bit.”
Modern manufacturing processes produce remarkably uniform and consistent products, whether it’s traps or television sets. But a TV doesn’t just start working perfectly when you unbox it and plug it in. It must first run through its internal programming functions, and then you must hook it up to a receiver — cable company, satellite company, metal antenna. Only then will the set work properly.
That doesn’t mean the TV is faulty. It just has to be tweaked, that’s all. The same thing is true of traps. They’ll work straight out of the box, but they’ll work much better if adjusted and treated.
Pre-Adjustment Cleaning
It’s best to make the physical changes and mechanical adjustments to your traps before boiling, dyeing, dipping or waxing them, since one of the objectives of treating traps is ridding them of objectionable odors. However, since traps fresh out of the box are often heavily coated with oil, fine metal shavings, and other stuff, they can be messy to work with. If you want to really ruin a pair of blue jeans and a T-shirt, wear them for an afternoon of working on a few dozen brand-new traps.
 On the other hand, this stuff won’t hurt you. If you don’t mind it, fine, but if you’d rather get your traps a little cleaner before working on them, there are several ways.
Burying the traps in wet leaves is an easy way to get rid of most of this factory residue, if time isn’t a factor. Just cover the traps well and keep the leaves wet for a week or two. The tannin in the leaves forms a weak acid that eats away the greasy coating. It will also usually start the rusting process, so don’t leave the traps in the wet leaves too long.
Alternatively, you can take greasy new traps to a self-serve car wash, lay them over the grate, and give them a thorough soapy washing. This is the fastest method.
Or, you can degrease factory-fresh traps by running them through a cycle in the dishwasher. Be sure the chains aren’t hanging down into the moving parts. Depending on trap size, an average dishwasher can hold three traps, or three dozen. This method works well and won’t harm the dishwasher, but use discretion; mothers, wives and girlfriends sometimes don’t think this is an appropriate use of a kitchen appliance.
Foothold Trap Adjustment and Modification
First, set and spring each trap to make sure it works. Next, give the trap a close visual inspection. Are the jaws level with each other when the trap is sprung? If not, lay a flat piece of hardwood across the jaws and tap it with a hammer to drive the jaws down until they’re even.
Do the ends of the jaws protrude far enough through the ends of the bottom plate so that they won’t pop out during the struggles of a trapped animal? If not, follow the procedure above to drive the laws a little lower and force the ends farther through the bottom plate.
Next, use a sturdy pair of pliers or crimpers to squeeze the eye of the trap dog tighter, where it’s attached to the dog arm. Don’t close the circle down so far that the dog binds and won’t work smoothly, but do take any extra play out of the circle. This adjustment makes it impossible for the dog to shift in relation to the dog arm and removes the possibility of “pan creep.”
 Next, file the dog and pan notch square. Trap parts are stamped rather than cut, and the stamping process results in rounded or roughed-up edges. The traps spring fine, but there’s often a lot of pan creep before they do. Filing the dog and notch square produces a smooth, precise fit between these parts, resulting in a clean, crisp firing action.
Some trappers file a second, shorter notch into the pan notch, called a “night latch.” The idea is to create a stair-step configuration inside the notch so the trapper can set the trap, and then, without having to look at it, slowly pull the pan down with his thumb until he hears the dog snap into the second notch. When this happens, the trap produces an audible click, and the trap is now on a hair trigger – in other words, it will fire with very little additional pan travel.
The night latch is a good idea, but too complicated. You can accomplish the same thing by filing the end of the pan notch down until there’s only a very short lip to hold the dog in place when the trap is set. A trap thus adjusted is automatically hair-triggered, and the step of pulling the pan down into the night latch is eliminated – as is the need to file the night latch into the notch in the first place. Keep it simple, remember?
Strictly speaking, neither the night latch nor the short notch is necessary, but both these modifications add a degree of uniformity to the way your traps will fire, and that’s never a bad thing.
The final step in pan adjustment is to make sure the pan sits level. Set the trap again. The pan should be level when the trap is level, and the pan height should be about the same height as the upper surfaces of the trap jaws. A little lower is okay, a little higher is not okay. If the pan angle is too high, bend the trap’s dog arm toward the jaws. If the pan is too low, bend the dog arm away from the jaws. Be conservative with the bending; a little movement in the dog arm alters the pan height considerably.
Few traps come from the factory with adequate chains. The proper modification depends on the intended use of the trap and on the trapper’s individual style and preferences, but here’s the way I do it:
First, I cut the chain at the second link from the trap (we’re assuming double-link chain here, the most common kind.) Then I use two bent rivets and a double box swivel to attach the one link of chain remaining on the trap to two more links of chain. The last step is to attach a universal swivel to the other end of the two links, again using a bent rivet. This produces about eight inches of trap chain with an in-line swivel. It’s efficient and versatile and works equally well on land and water, on stakes, slide wires, or extension chain with drags or grapples.
There are many more possible foothold trap modifications, some of them pretty complicated. Laminating the jaws by welding or bolting an addit ional piece of metal to the jaws is one popular modification, especially for raccoon and coyote trappers. The purpose is to increase the amount of jaw surface that contacts the animal’s foot, thus increasing holding power and reducing pull-outs. Laminating jaws is time-consuming, though, and the increased surface area of the jaws means the jaws have to travel through more dirt or water, slowing the action. It also increases the chance that the trap will become clogged with debris or dirt and fail to close properly.
Some experienced and accomplished trappers move the chain attachment to the bottom of the trap, using either a short length of chain around the base plate or a rivet through a hole bored through the base plate. Again, the objective is to reduce losses. But this method results in a trap that is harder to bed in firm or rocky ground, because the bottom of the trap has trap chain attached and is no longer smooth and level.
Both above modifications increase the holding power of a trap, but in my opinion there’s a better, simpler way to modify your coilsprings: just use stronger springs. Some trappers add an extra set of coilsprings (four-coiling kits are commercially available) but the easiest method, and the one I prefer, is simply replacing the factory springs with springs designed for a larger trap. I install number 3 coilsprings on my 1?s, and put the 1? springs on my 1?s. The result is a fast, powerful trap that doesn’t weigh any more and doesn’t have an uneven bottom surface, but holds as well as any trap of its size.
Bodygrip Trap Adjustment and Modification
As with footholds, make sure each trap operates properly. Some bodygrippers fresh from the factory won’t stay set. The most common reason is that the notches in the trap dog aren’t deep enough to hold the opposite trap jaw securely. Fortunately, this defect is easy to fix by using a rat-tail file to make the notch a little deeper.
Another occasional defect shows up in the rivets or bolts that hold the trap jaws together at the hinge. Again, this is easy to correct. Simply drill the old rivet out and replace it with a carriage bolt and nut of the proper dimension, with the head of the bolt on the inside of the jaws.
Adding a swivel to the chain of larger body grippers (#160 to #330) is a good investment. It’s not as important with #110-sized traps, but if you don’t add a swivel to the chain of your larger bodygrippers, it’s going to cost you. Bodygripper traps are designed to kill the target animal, but it doesn’t always happen quickly, and sometimes not at all. When a catch is still alive in the trap, it will twist and fight. Bodygrippers come from the factory with the chain attached directly to the trap spring, and this often results in a tightly twisted chain with no swiveling action.
To add a swivel, remove all but one link of chain from the trap and insert a box swivel into the chain as described in the foothold section above. Then replace the remainder of the chain (short or long, as you wish,) add a universal swivel on the end opposite the trap, and you’ve vastly improved the holding power of any bodygripper during non-lethal captures.
One final modification to #110-sized bodygrippers used for mink trapping is extremely important: looping the triggers. It’s also wise when using #280 and #330 bodygrippers for otter. These two animals sometimes go through standard bodygrippers without getting caught, or else they get so far through they’re caught by the hips or back legs. The result is a live animal in the trap, which can lead to fur and trap theft, fur damage, the escape of the captured animal, or worse, the escape of the captured animal still wearing the trap.
Looping a bodygripper’s trigger is easy. Simply string a length of wire or monofilament fishing line between the two wires of the trigger. My preference is small-diameter craft wire, available at hobby and craft shops. It’s sturdy and can be wrapped around the trigger wires, but fishing line must be tied on.
Whatever you use, first roughen the ends of the wire triggers, so the wire or line won’t slip off. Rough sandpaper or a coarse file are good for this, or you can score the wires with a pair of cutting pliers. Some trappers flatten the ends of the wires and drill a tiny hole through the flattened portion, but this is tedious and too complicated, and the end result is no better. Remember the K.I.S.S. rule.
Pick and Choose Your Methods
No single trap needs all the modifications and treatments we’ve discussed here, of course. Some traps require far less tweaking than others when they come out of the box, even when you’re looking at traps of the same brand, packed in the box beside each other.
There’s no sense in doing something to a trap when the trap doesn’t need it.
The most important thing about trap modification and adjustment is to recognize that a certain amount of it is desirable if you plan to run an efficient trapline. Get it done, and reap the benefits.
This is an excerpt from Chapter 4 of Jim Spencer’s newest book, “Guide to Trapping.” For an autographed copy, send $19.95 plus $4 postage & handling to the author at P.O. Box 758, Calico Rock, AR 72519. For two or more copies (must be mailed to the same address), the price is $16.95 each, plus $4 postage & handling.
